Designer Fan Installation: Ceiling Provisioning Guide
Before a designer ceiling fan is installed, confirm the exact model, the support above the finished ceiling, the complete hanging drop and the electrical/control arrangement. These decisions are easier to resolve before the false ceiling is closed or painted.
This is a provisioning checklist for the homeowner, architect, ceiling contractor and electrician. The selected fan's installation manual and the site's approved support design determine the final fixings, clearances and electrical work.

1. Select the fan before finalising the ceiling point
Give the installation team the exact model and variant, its weight, mounting drawing, complete installed drop and the supplied mounting-kit details. Confirm any approved shorter or longer rod with the manufacturer. An existing fan point or suspension rod does not by itself establish compatibility with a new designer fan.
Use our designer ceiling-fan buying guide to compare blade sweep, hanging height and controls before the ceiling contractor starts the provision.
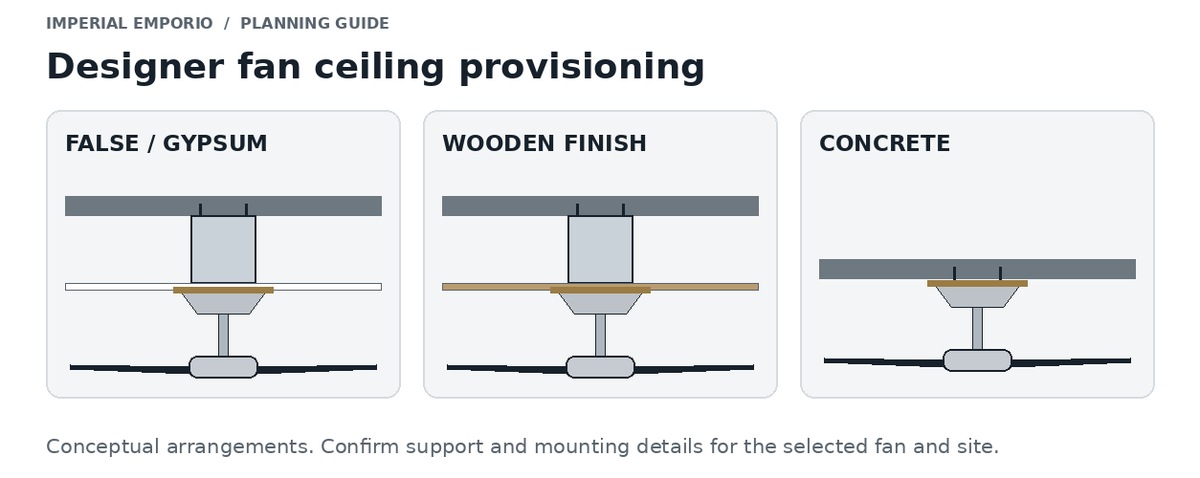
2. Provision for a false or gypsum ceiling
The fan needs a load-bearing mounting arrangement connected to suitable structure. Gypsum board and its decorative finish must not be treated as the fan support.
Depending on the selected fan and site, the approved arrangement may use a backing assembly, support box, bracket or another specified system. Have the installation team agree its construction, fixings, position and finished level. A sketch showing a wooden box is not a substitute for that specification.
- Measure the gap between the structural ceiling and finished false ceiling.
- Coordinate the support depth with the bracket and canopy drawing.
- Confirm that fixings engage the approved load-bearing support.
- Keep the required cable entry and service access available.
3. Provision for a wooden or plywood ceiling finish
Distinguish the decorative lining from the structure carrying the fan. A plywood thickness alone does not establish the capacity of the complete assembly: the supporting frame, fixings, fan loads and mounting arrangement also matter.
If the manufacturer permits mounting to a particular timber support, have the installer confirm the complete detail for the actual ceiling. Do not apply a generic 12 mm or 19 mm plywood detail to every designer fan.
4. Provision for a concrete ceiling
The mounting bracket and fixings must suit the actual structure and the selected fan. Have the installer assess an existing hook, recessed box or previous mounting point before assuming it can be used.
If an adapter or clamp is required, confirm the approved component and its compatibility with the fan and structure. Discuss availability and cost before installation; do not assume that any fabricated clamp or existing hook is suitable.
5. Allow space for the canopy, receiver and controls
Some models place their receiver/controller inside the upper canopy. Check the exact arrangement, required space, cable routing and access for servicing. Do not crowd the canopy with an incompatible rod, support detail or control accessory.
Use the manufacturer-supplied or expressly approved rod and mounting kit. A remote-controlled fan is not automatically compatible with an existing wall regulator or every home-automation system. Confirm the intended controls before the electrician finalises the provision.
Electrical supply, isolation, earthing and connections must be completed by a qualified electrician in accordance with the selected model's instructions and the applicable local requirements.
Before closing the false ceiling
| Check | Record or confirm |
|---|---|
| Fan | Exact model, variant, weight and mounting drawing. |
| Support | Approved support assembly, structural connection and fixing position. |
| Levels | Finished ceiling height, ceiling-void depth and complete installed drop. |
| Clearances | Manufacturer-required distances from the floor, walls, beams, lights and other obstructions. |
| Electrical and controls | Agreed power/control arrangement, cable entry, canopy/receiver space and service access. |
| Site record | Photographs of the support and electrical provision before they are covered. |
Installation and handover
Have the installer follow the exact model's assembly and commissioning instructions, check its mounting, operation and controls, and hand over the manual and supplied accessories. Discuss any unexpected movement or noise with the installer before normal use.
Send us the ceiling provision before work starts
Share the fan model, a ceiling photograph, finished ceiling height, ceiling-void depth and any existing hook or box details with Imperial Emporio. We can help obtain the relevant model information for your installation team.
Browse designer fans and ceiling fans, or visit the lighting and fan buying-guide library.
Manufacturer reference: Hunter's installation guidance explains the importance of fan-rated mounting support and using the specific model's manual. Use the instructions supplied for the fan and site in your own project; regional installation requirements and mounting systems vary.

Written by Imperial Emporio